For many businesses, recordkeeping is a chore, a byproduct of the countless records created each day. Because these records often contain sensitive information about customers, vendors, or employees, they need to be handled with care.
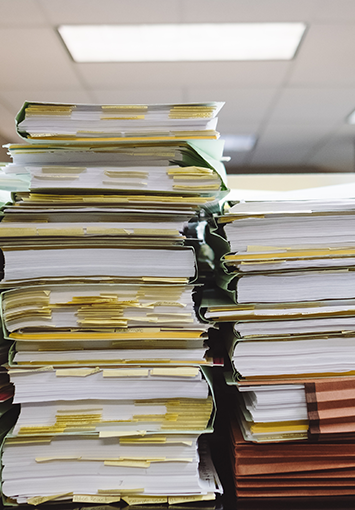
As those records continue to pile up, keeping everything organized and secure can be difficult, especially when they’re stored on paper. Managing paper takes extra time, space, and effort, none of which adds real value to your work.
That’s where document imaging comes in. It’s a technical name for a relatively simple process that takes the stress out of managing business records. It helps businesses maintain large volumes of information without the headaches that come with paper.
In this article, we’ll explain what document imaging is, how it works, and why so many businesses are digitizing their paper records.
What Is Document Imaging?
Document imaging is the process of converting paper records into digital files that can then be stored and managed electronically. Instead of relying on folders, dividers, or filing cabinets to organize your records, document imaging creates a text-searchable index of your files, allowing you to find specific documents or details instantly with a simple search.
Document imaging services like ours give businesses that still rely on paper an easy way to digitize and bring structure to their records all at once. It’s an effective way to preserve older files while preparing them to work seamlessly within a modern digital system.
How It Works
Each record is converted into a high-resolution image using commercial-grade scanning equipment. Important details like the date, author, or department are then captured and attached to the file as metadata. This makes it easy to search, sort, and retrieve records based on those details later on.
The Technology Behind It
Document imaging relies on a combination of hardware and software to produce accurate, usable digital records. High-resolution scanners capture each document in full detail, while optical character recognition (OCR) software, along with manual data entry when needed, converts printed text into searchable digital text. The final files are typically delivered as PDFs or TIFFs, making them easy to store, index, and share.
The Benefits of Document Imaging
Managing your records electronically takes a lot of the stress out of recordkeeping. Once your files are digitized, it’s much faster to find what you need, keep information secure, and reduce costs over time. Here are some of the benefits:
Improve Efficiency
Finding what you need takes seconds when your records are stored electronically. There’s no need to sort through folders, drawers, or storage boxes. A quick search by name, date, or keyword brings up the information right away, making everyday work faster and far less tedious.
Reduce Costs
Paper records take up more space and time than most people expect, and both come with ongoing costs. Digitizing records helps businesses save money by reducing the need for storage space, filing supplies, and the time spent tracking down information, which can add up over time.
Improve Information Security
Digital records can be encrypted, password-protected, and access-controlled, giving you much more control over who can view sensitive information. Paper files, on the other hand, are accessible to anyone with access to a file room or storage area. With digital records, customer, vendor, and employee information stays more contained and easier to monitor.
Better Use of Space
Digitizing your records can free up a surprising amount of space. Rooms once filled with filing cabinets or storage boxes can be repurposed into work areas, meeting spaces, or something as simple as a more open office layout. It gives you more flexibility in how your space is used.
Disaster Recovery
Paper files are vulnerable to just about every mishap imaginable, from fire and water damage to theft or accidental disposal. With digital records, you can easily back up and store multiple copies of your files, keeping your information safe even if something unexpected happens. And if disaster strikes, your records can be restored quickly, giving you peace of mind that your data will always be accessible.
A Smaller Environmental Footprint
While digitizing documents doesn’t undo the paper that’s already been used, it does open the door to more sustainable recordkeeping going forward. Once files are scanned, the original paper can be securely shredded and recycled, keeping it out of the landfill.
Moving to a digital recordkeeping also helps reduce future paper use by replacing filing and printing with electronic storage and sharing. Over time, those small changes add up to a meaningful reduction in both paper consumption and environmental impact. It may not be a major priority if at all, but it can’t hurt either.
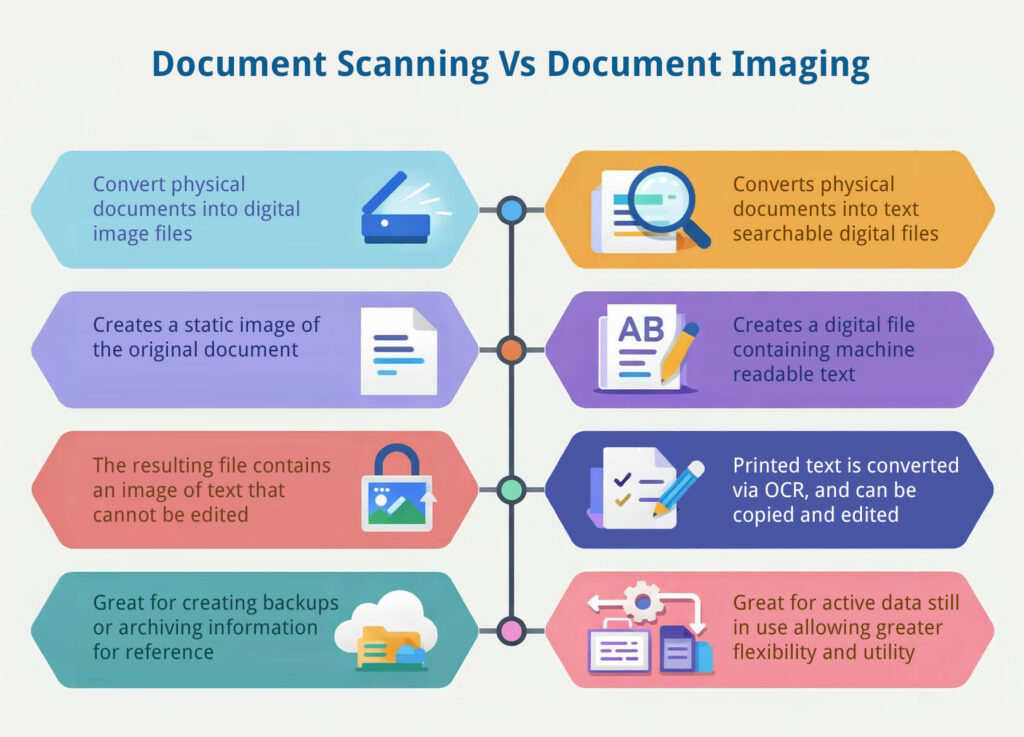
What is the Difference Between Document Imaging and Scanning?
Although scanning and document imaging are used interchangeably, they’re not exactly the same thing. Scanning is the first step, the process of creating a digital copy of a physical document.
Document imaging starts with scanning, but also includes organizing, indexing, and storing those files in a way that makes them easy to find and manage later on. In other words, scanning creates the image, while document imaging turns that image into part of a usable, searchable digital system.
The Document Imaging Process
Document imaging is a structured, step-by-step process designed to turn paper records into a digital filing system that’s easy to manage and search. While every project is different, most follow a similar workflow to ensure the final files are accurate and easy to find.
Step 1: Preparing the Documents
Before scanning begins, each record is prepared to ensure the best possible image quality. This involves manual tasks like removing staples, smoothing out creases, and taping down sticky notes. Documents are placed in their correct order, and each batch is given a cover sheet with tracking information. This step ensures that every page is accounted for from the moment it is prepped until the project is finished.
Step 2: Scanning
Once the records are ready, technicians calibrate the scanners to match the specific needs of the documents, fine-tuning settings for clarity and resolution. The documents are then scanned in batches, converting them into the high-resolution digital images that serve as the foundation of your digital archive.
Step 3: Image Enhancement
After scanning, each image is reviewed to make sure it’s readable. If anything appears too dark, faint, or unclear, adjustments like brightness and contrast are applied to improve legibility while keeping the original content intact.
For projects that follow FADGI standards, such as certain government or historical collections, these adjustments are not applied. In those cases, images are preserved as exact, unaltered replicas of the original documents.
Step 4: Indexing and Organization
This is the step that makes your digital files searchable. Important information, like names, dates, or document types are captured. This is often done using optical character recognition (OCR) or entered manually by an indexing team. This data is attached to each file as metadata, allowing you to search for records by category, department, or any other structure that fits your business.
Step 5: Quality Assurance
To ensure accuracy, technicians manually review the digital images against the original documents. They check to make sure every page was captured correctly and that the right labels (metadata) were attached. This human review is a critical safety net before the files are approved for your archive.
Step 6: Delivery and Storage
Finally, the completed files are delivered based on how your business operates. They can be uploaded directly into a document management system, delivered on an encrypted drive, or transferred securely via SFTP. The goal is to ensure your records are organized, protected, and easy for your team to access.
Is Document Imaging Accurate?
The accuracy of document imaging depends on the technology, process, and quality controls used throughout the project. Optical character recognition (OCR) software can capture text from scanned pages with impressive precision, but the final results still rely on the condition of the original documents, scanner calibration, and the capabilities of the imaging software. Consistent quality assurance and proper equipment settings are key to maintaining accuracy.
At SecureScan, every image is reviewed to ensure it matches the original document exactly. If a scan doesn’t meet our standards, it’s adjusted and re-scanned until we achieve a perfect reproduction. Beyond image accuracy, we also verify the information captured from each file through double-blind data validation, ensuring that the data you receive is as accurate as possible.
Comparing In-House and Professional Document Imaging
There is no one-size-fits-all approach to document imaging. The right choice for your business depends on how many records you have, your budget, and how fast you need the project done.
Option 1: In-House Scanning
Handling the scanning and tagging yourself works best for small, daily projects or for highly sensitive records that cannot leave your office.
- The Benefits: You keep full control over your documents at all times. It is a cost-effective way to handle low-volume scanning, like daily mail or a few client intake forms, using the equipment you already have in the office
- The Trade-offs: The process is manual and can be prone to errors. Most people find that the hardest part isn’t the scanning itself, but the organizational aspects. Keeping naming conventions, folder structure, and indexing consistent across hundreds of files is difficult and time-consuming.
Option 2: Professional Document Imaging Services
Professional imaging services are best for large-scale bulk scanning projects, or when you have complicated legal requirements, like in the medical or government fields.
- The Benefits: Professional services use high-speed scanners and have teams dedicated to the process, which makes it much faster to complete large scanning projects. Beyond the equipment, these services include manual mapping of your documents and data extraction handled by experts. This work is then checked by a quality assurance team to ensure the information is accurate. They also maintain a secure chain of custody and follow strict workflows, like HIPAA or SOC2 compliance, which can be difficult to manage with standard office tools.
- The Trade-offs: There is an upfront cost for the service. Additionally, since the scanning happens at a dedicated facility, it requires coordination regarding which records you can be without during the process or which ones may require access by special request while they are off-site. For a business with only a few folders to digitize, professional services may be overkill.
Set Your Imaging Project Up for Success
Document imaging completely changes how a business manages its records, but there are a few common mistakes that can slow the process down or create issues later on down the road. Knowing what to watch for and how to prevent it ensures your project goes off without a hitch.
Preparation and Strategy
Planning ahead is one of the most important steps in any document imaging project. It helps to think through how and when the work will happen so it causes as little disruption as possible. This includes choosing the best time to start, arranging any extra support your team might need, and preparing for certain records to be temporarily unavailable while they are being scanned. A little planning upfront makes the entire process easier for everyone involved.
Prioritizing Privacy and Compliance
When records contain personal or sensitive information, it is important to identify those materials early on in the process. Flagging documents that need special attention and being clear about the requirements for those records helps ensure everything is managed in line with privacy laws. Taking this step at the start protects your business and keeps the process running smoothly.
Disorganized or Duplicate Records
A messy archive going in often means a messy archive coming out. Duplicate files, outdated records, and disorganized folders can make the imaging process take longer than it should and add unnecessary costs. Before scanning begins, take time to review your records and decide what truly needs to be kept. Removing duplicates and unnecessary paperwork helps ensure your new digital archive is clean, organized, and easy to manage from day one.
Organizing Before You Start
A disorganized archive going in often leads to a disorganized archive coming out. Duplicate files or outdated records can make the imaging process take longer and add unnecessary costs to your project. Before scanning begins, take time to review your records and decide what truly needs to be kept. Removing unnecessary paperwork ensures your new digital archive is clean and easy to manage from day one.
Securing the Future of Your Data
Digital records are only as secure as the system they live in. It is important to have a plan for how your digital files will be stored, who will have access to them, and how that access will be monitored. Setting up permissions, encryption, and regular backups helps protect your records long after the scanning is complete.
Final Thoughts
Document imaging makes managing records simpler, faster, and more secure, giving businesses a clearer view of their information and more control over how it’s used. Understanding how the process works, what to expect, and how to prepare ensures that your document imaging project is a success.
SecureScan has been helping businesses of all sizes transition from paper to digital systems with accuracy, care, and security at every step since 2004. Whether you’re ready to start your document imaging project today or are just exploring your options, our team is here to help. Contact us today or request a free quote to learn more about how we can make your transition to digital effortless.